
With Writable Volumes, you can configure per-user volumes where users can install and configure their own applications and keep the data that is specific to their profile. A Writable Volume is assigned to a specific user and becomes available to the user from any machine.
A Writable Volume can contain data such as application settings, user profile, licensing information, configuration files, and user-installed applications.
Using App Volumes Manager, you can create, import, edit, expand, and disable Writable Volumes.
Configuring Writable Volumes :
Access the VMware App Volumes management page and enter the credentials. Click Login.

Go to Writable tab and click Create.

Specify the Domain and enter the name of the account to assign the volume and click Search

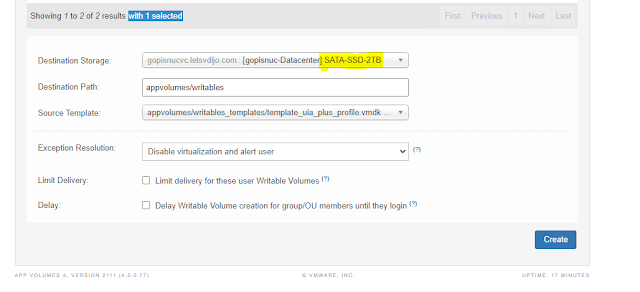
Select the Source Template to be used and click Create

Specify the Destination Storage if you want to change and the Source Template. Click Create
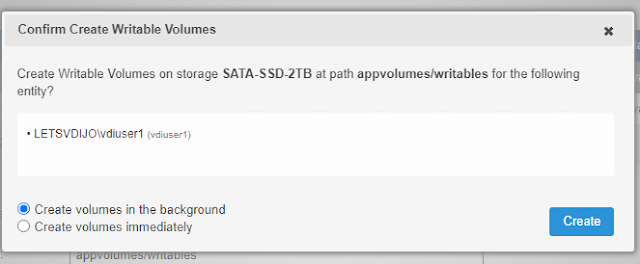
Select option Create volumes in the background to avoid waiting time. Click Create.
The Status is reported as Working since the creation in background has been chosen.

After some minutes, the volume is ready. Status is reported as Enabled while the State is reported as Detached since the created volume hasn't been connected to the user yet.

Before attaching the created volume to the user, the App Volumes Agent must be installed in the Golden Image and deployed to clones.
Install App Volumes Agent
Copy the Agent setup file to the Golden Image and run the installation wizard. Click Next.

Accept the EULA and click Next.

Select Install App Volumes Agent option and click Install.

The App Volumes Agent wizard opens. Click Next to begin the Agent installation.

Enter the App Volumes Manager Address previously installed and untick option Disable certificate validation with App Volumes Manager.

Click Install to proceed with the installation.

The Agent is being installed.

When the installation has been completed, click Finish to exit the wizard.

Click Yes to restart the computer and complete the installation.

Once the Golden Image has been updated with the new Agent, schedule a Maintenance to redeploy the new image to Instant Clones.
Test Writable Volumes
To test if the Writable Volume is actually attached to the VD in use, access the VMware Horizon login page and enter the user credentials then click Login.
To check if the volume has been mounted, open the File Explorer tool and make sure to enable View > Hidden items option. Locate the SnapVolumesTemp folder under C:\. This is the Writable Volume attached to the logged in user.

In the Writables tab of the App Volumes Manager, the Writable Volume assigned to the logged in user is now reported as Attached.

In the next blog, let us discuss how to deploy some applications (AppStacks) to specific users or groups.


0 Comments